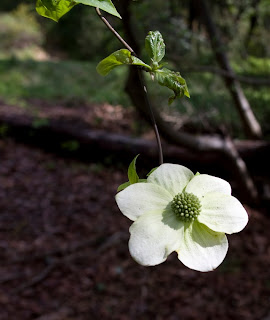
Did you ever set up a shot like this and wonder if your camera’s light meter was malfunctioning? In the photo above, the dogwood blossom was in a wooded area with a few shafts of light filtering through, so most of the background was quite dark. On my first try, I used the camera’s readings to adjust the exposure, and fired away. In the resulting image, the blossom appeared completely washed out – no veining or detail at all. Then I remembered what photographer John Greengo said about not always trusting your camera’s readings, and decreased the aperture so the camera’s exposure level indicator showed the image would be about two steps underexposed. Doing so gave me the balance I wanted. That was my first object lesson in exposure compensation.
Backlighting, very light or very dark subjects, or complex combinations of light and shade can fool even sophisticated cameras.
 4 May 10 by The Daily Photo
In this dramatic image, there's enough exposure to allow some detail from the buildings - the R T or A T TAILOR ad, for example - but it's dark enough to make the Leo's sign front and back really stand out. Check this out on Melissa's etsy site, The Daily Photo, to get the full impact.
Melissa said she used the following settings to get this effect:
Shutter Speed 0.3sec
F-stop 5.6
ISO Speed 1600
"I manually adjusted my 1600 ISO, but let the camera choose the shutter & F-stop for me. I think I was lucky! I also processed it in Photoshop," she said. "I remember that I didn't process too much - I adjusted curves and I also adjusted the brightness/contrast too, but that was it...I didn't add any fill light at all, nor adjust exposure...
Both Melissa and Kim expressed a desire to learn more about the science and craft of photography - a desire I share. I hope more poe team members will chime in! That's what a collaboratory is - a gathering of minds to bat around ideas and maybe come out of the experience knowing a little bit more.
Nakedeye17 (Su) thinks of photography as a wake-up call: "Hey, everybody! Are you seeing this?" She loves to capture humor, too, and anything wondrous strange. Find Nakedeye17's shop here


2 comments:
Great article!
I
Nice post Su. Thanks for asking me to participate.
Kim
Post a Comment